


Since finding this method for reducing digital noise in my images, I’ve started going back in my catalogue to update all my keeper photos.
If you’ve been watching my YouTube videos you may have noticed that I regularly try to keep my ISO as low as I can.
Often I’m photographing birds with a less than optimal shutter speed at 1/200th sec or even 1/100th sec or lower!
Such low shutter speeds often lead to motion blur as the birds won’t always keep still, especially in flight of course, and it means a less than 100% success rate of sharp images.
However, as I shoot with a cropped sensor (Canon 7D ii) which is prone to noise at higher ISOs, I always figured the compromise was worth it.
Cropped sensors aren’t known for being the best at handling noise. One of my main reasons for wanting a full-frame body would actually be to crank up that ISO without dire consequences.
Up until now my standard method for dealing with sharpening has been to use the Lightroom noise reduction ‘Luminance’ slider: crank it up to 15, maybe 20 and leave it at that.
Probably needless to say, this only slightly reduced some noise, and if I went too far with the luminance, the image would often become a bit soft.
Recently, however, I came across a noise reduction tool called DeNoise AI by Topaz. It’s so good, it’s got me kicking myself that I didn’t look into a specialised noise reduction tool sooner!
DeNoise is easy to use, which is essential as I probably would never use it if I’d needed to learn more complex methods on top of the long list of things I want to learn in Lightroom and Photoshop.
Let’s check out some images that I have used DeNoise AI on:
Coal tit ISO 1600 after DeNoise AI
Before / After
Default Settings by DeNoise
Remove Noise 0.15
Enhance Sharpness: 0.15, and
Recover Details 0.0
These are the default settings by DeNoise, and I tend to leave them as they are unless it’s a particularly noise image.
As you can see in the coal tit image above there’s quite a bit more noise when pushing the ISO up to 1600.
I don’t often go above ISO 1600 with the Canon 7D ii because of the noise issue..
However, now I’m not that afraid to push the ISO higher in the knowledge that I got a program that can deal with the noise, I feel I can push the ISO a bit more to achieve a faster shutter speed in low light conditions.
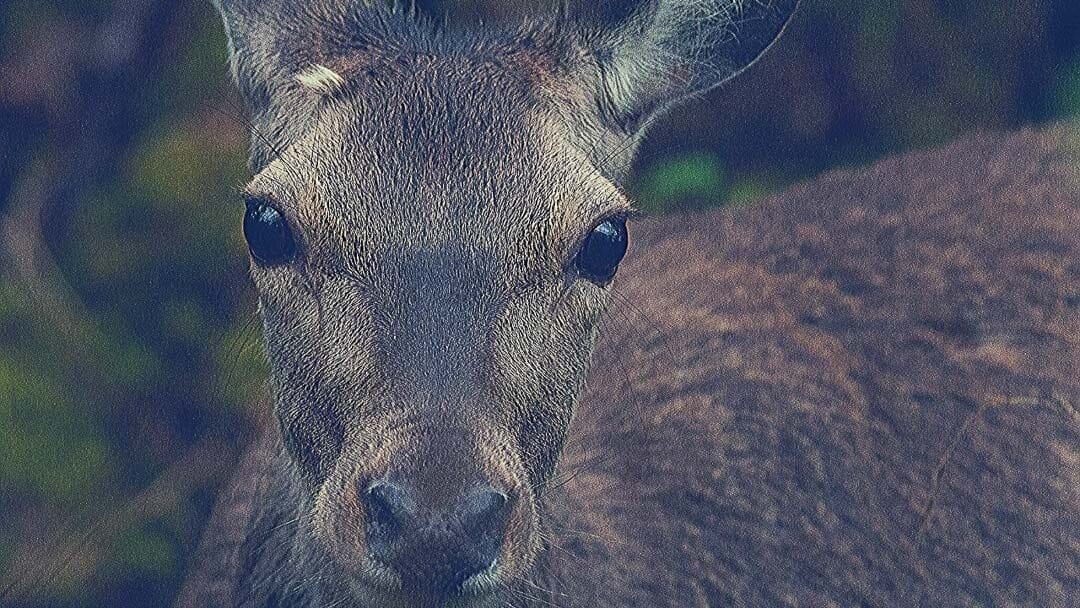
Red deer ISO 3,200: Before Noise Reduction
Red deer ISO 3,200: After DeNoise AI
Before / After closeup
As you can see in this image of a red deer at ISO 3,200 I increased the Remove Noise to 0.30 because I didn’t’ think the default of 0.15 was quite enough to remove unwanted noise.
Now let’s just take this to the extreme, ISO 10,000!!!
I was walking to the shores of Cramond outside Edinburgh just before sunrise, when I walked past a narrow street, where, out of the corner of my eye I noticed a red fox.
I kept walking, pretending I didn’t see it until I was hidden behind a fence.
I then dialled in my settings: f/5.6, 1/80s, ISO 10,000.
This felt so unnatural with the Canon 7D ii.
I peaked behind the fence and the fox looked up at me and I managed to get a couple of shots before it ran off.
The image still came out a bit under-exposed and, as I expected, there was more noise in this image than at your average heavy metal concert.
Red fox ISO 10,000: noise reduction and sharpening with Lightroom
Red fox ISO 10,000: noise reduction and sharpening with DeNoise AI
Before DeNoise AI
After DeNoise AI
You’ll see in this image I really had to push the sliders in DeNoise AI a bit further.
I’m not saying that it’s a perfectly sharp image now, but for a photo taken at ISO 10,000 with the Canon 7D ii, I am very much impressed with what this software can do.
Remember – the image was also taken at 1/80th second, so some motion blur is also likely.
The only downside that I can tell is that it takes a bit of time (with my laptop anyway) to “DeNoise” the image.
However, I don’t find this significant as I’m becoming more selective about which images are worth going through the whole editing process.
For the price,$80, it is absolutely worth it to me. The difference in my finished images made this purchase a no brainer to me.
(Disclaimer: DeNoise was NOT given to me by Topaz, I tried the 30-day free trial and upgraded almost immediately because I knew I needed it, I could see the value, and I think and it’s an outstanding product. This link is an affiliate link which means I get a small % of sales should you decide to purchase the product too).
So it’s at no extra cost to you if you use the link but hey, you might even get a good feeling in the knowledge that you threw some change my way! I really appreciate it.
Anyway, I recommend you try DeNoise AI for 30 days free – so you’ve got nothing to lose.


be the first to comment